Search This Blog

Wednesday, September 1, 2010

Lifecycle Manager/Import Wizard


This document describes Lifecycle Manager & Import Wizard

Import Wizard:
  1. The Import Wizard is a desktop tool which is used for importing user accounts, groups, folders, and reports. The screens that appear depend on the types of information that you choose to import.
  2. Used for promotions from lower version of BusinessObjects Enterprise to Higher.(Source and destination are not required to have same version of BusinessObjects Enterprise application installed).
  3. The Import wizard used to converting older version reports to new version.And creating the BIAR files. 
BIAR(Business Intelligence Archive Resource files):-

 These files are used by BO to store content in the enterprise system which can also be moved across environments. So if you have to move a file from development to production it goes across as a BIAR file.And is similar to a ZIP file in that it is used to collect objects together to facilitate easier backup, restore or transport of objects from one system to another. 

Importing user accounts, groups, folders, and reports we have two possible solutions for that.

  • One is called the Import Wizard which is a Windows Client tool.
  • The other is Lifecycle Manager (LCM) which is a Web based tool.

Lifecycle Manager (LCM):-
 
Business Objects Lifecycle Manager (LCM) is a web-based tool that enables you to move BI resources from one system to another system, without affecting the dependencies of these resources. It also enables you to manage different versions of BI resources, manage dependencies of BI resources, and roll back a promoted resource to restore the destination system to its previous state.

The LCM tool is a plug-in for the Business Objects Enterprise application. You can promote a BI resource from one system to another system only if the same version of the Business Objects Enterprise application is installed on both the source and destination systems.

The tools also add the capability to setup Version control in a development environment.

Installs as new Web Application on your Tomcat Server. http://boserver/LCM/


Transportation/Migration from one environment to another in BO is done by Import Wizard by creating BIAR file. i.e when someone wants to migrate from Dev to Prod environment or from earlier version of BO to latest version then using Import wizard at source we will create a BIAR file. The BIAR file is in XML Format and is compatible to any O.S. The Same BIAR File is again run in destination so that all the info from earlier environment is copied to existing or latest environment.

For a copy of this document  contact me :
Praveen Yagnamurthy,
SAP  Consultant,
Blue Marlin Systems-INDIA.
http://www.bluemarlinsys.com/bi/info/bipapers.php


Wednesday, August 18, 2010

Xcelsius 2008 Connectivity Options


The following are the most commonly used methods for Business Objects Xcelsius Connectivity:
  1. Query as a Web Service.
  2. Live Office.
  3. SAP Netweaver BI Connector.
Query as a Web Service (QAAWS) is a Business Objects web service. This Web service is capable of accessing ONLY Business Objects universes to extract data.  Whenever a dashboard is executed, a real-time query is executed against the actual data which takes time depending on the amount of data requested for the dashboard. It is not a very effective solution and those who use it should have highly summarized tables in their data warehouse to use this feature and to do this, it consumes a lot of efforts. The advantage of using this method is the securities issue which already a part of BO user IDs and real-time data retrieval whenever required. The disadvantage of this method is that bulk data such as more than 500 records returned by the web service will slow down the performance of the dashboard considerably. Moreover there is no staging for data fetched in the Xcelsius spreadsheet. Hence QAAWS can be used whenever:
  • The response time from the data source is a small value.
  • The data source provides data that can be readily consumed by the Dashboard.
  • Real time data or live data is to be used in the dashboard.
  • The query result set is very small and limited like a standard table.
  • Multiple query result sets are to be placed in the same range of the spreadsheet.
  • Multiple Universes are involved for the data required by the dashboard.
  • Universe contains and is capable of implementing all the required logic.
  • There is need to document and manage queries in QAAWS client.
  • Portability is required as QAAWS can more easily be ported to other applications as well.

Live Office can be used to access Business Objects Web Intelligence (WEBI) or Crystal reports as a source of data. Moreover it can leverage the functionality of these reporting tools to summarize and format the data.  The advantage is that the reports can be scheduled and presented using Business Objects InfoView and the latest report can be used by the Xcelsius Dashboard to pick the data thus avoiding the waiting time.  The Live Office Connectors allow you to bind multiple queries (views) to a single connector resulting in less enterprise connections that finally increases the level of a parallelism in the query execution. Live Office physically presents the query output in the Excel workbook of the dashboard. The disadvantage is that the user has to logon into Business Objects every time they need the access the dashboard and most companies do not prefer this method as it does not support single sign-on.  Moreover this does not work when used outside the network. There are many instances where network connections are broken and reports are not being refreshed.  The dashboard performance is also affected when the extracted data is huge, as the data is stored in the Xcelsius spreadsheet. So whenever historical or detailed data has to be presented, it affects the performance. Finally Live Office can be used whenever:
  • The Query response from the data source is expected to be too long.
  • Lots of data processing is involved like ranking, grouping, synchronization of queries etc.
  • There is need to use WEBI / Crystal Report features like formulas, variables and cross tabs.
  • Additional logic needs to be added in the intermediary layer that is the report layer.
  • Bursted reports or scheduled reports can be used as data sources without hitting database.
  • SAP is used as the data source, since crystal reports can directly access R/3 as well as BI.
  • Data from multiple reports needs to be displayed on the dashboard.
  • Simplicity is required as Live office is displayed as simple Excel Toolbar.

SAP Netweaver BI Connector is a process of Integrating SAP Data based on a BI Query with Business Objects Xcelsius Dashboards. Based on this integration the BI dashboards are presented and the reports are defined based on the user's requirement The BI query will be acting as the data source in which the BI Query will consume data from any of the BI data targets ( DSO, Infocube, Extractor, Infoset etc). It involves the following steps:
  • Designing the BI Query.
  • Configurations on the Xcelsius Connectivity.
  • Designing the Xcelsius Canvas and Mapping process for the Components.
  • Presenting as Xcelsius Dashboard.

Uday Kumar P,
uday_p@bmsmail.com
Blue Marlin Systems Inc.,
www.bluemarlinsys.com/bi/info/bipapers.php
 

SAP BI Importent Transaction List.

RS00 - Start menu


RS12 - Overview of master data locks

RSA0 Content Settings Maintenance

RSA1 BW Administrator Workbench

RSA10 Realtime Test Interface Srce System

RSA11 Calling up AWB with the IC tree

RSA12 Calling up AWB with the IS tree

RSA13 Calling up AWB with the LG tree

RSA14 Calling up AWB with the IO tree

RSA15 Calling up AWB with the ODS tree

RSA1OLD BW Administrator Workbench (old)

RSA2 OLTP Metadata Repository

RSA3 Extractor Checker

RSA5 Install Business Content

RSA6 Maintain DataSources

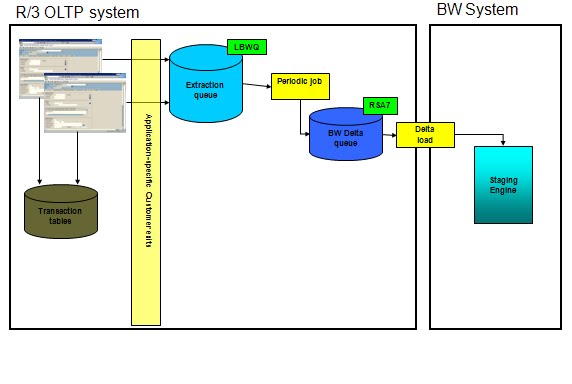
RSA7 BW Delta Queue Monitor

RSA8 DataSource Repository

RSA9 Transfer Application Components

RSADMIN maintenance

RSADRTC70 TO ADR11 Conversion of table TC70 in ADR11

RSANWB Model the Analysis Process

RSANWB_CRM_ATTR Fill CRM Attributes

RSANWB_EXEC Execute Analysis Process

RSANWB_IMP Calculation of Importance

RSANWB_START_ALL Model the Analysis Process

RSANWB_SURVEY Analysis Process: Create Target

GrpRSAN_CLTV CLTV Modeling

RSARCH_ADMIN BW Archive Administration

RSARFCEX Variant for RSARFCEX

RSASSIBTCH Schedule Assistant in Background

RSATTR Attribute/Hierarchy Realignment Run

RSAWB New AWB

RSAWBSETTINGSDEL Delete user settings of the AWBRSB0 Maintain OLAP authorization objectRSB1 Display authorization objectRSB2 Data Marts Generation Center

RSBBS Maintaining BW Sender-Receiver

RSBBS_WEB Transaction for the RRI in the Web

RSBCTMA_AC xCBL Action Codes

RSBCTMA_DT Mapping of Ext./Int. Document Type

RSBEB Business Explorer Browser

RSBMO2 Open Hub Monitor

RSBO Open Hub Maintenance

RSBOH1 Open Hub Maintenance

RSBOH2 Open Hub Maintenance

RSBOH3 Open Hub Maintenance

RSBO_EXTRACT Auth Check Open Hub Extraction

RSBROWSER BW Browser

RSBWREMOTE Create Warehouse User

RSCATTAWB CATT Admin. Workbench

RSCDS Summarization routine

RSCONCHA Channel conversion

RSCONFAV Favorites Conversion

RSCRMDEBUG Set Debug Options

RSCRMISQ Regis. of Infosets for Target Groups

RSCRMMDX Edit MDX

RSCRMMON Monitor Query Extracts

RSCRMSCEN Regist. Closed-Loop Scenarios

RSCRM_BAPI Test Program for RSCRM Interface

RSCRM_REPORT BW Queries with ODBO (to 2nd 0B)

RSCRT BW Monitor (Near)-Real-Time Loading

RSCR_MAINT_PUBLISH Maint. of Publishing Variables CR/CERSCR_MAINT_URL Maint. of URL Variables for CR/CE

RSCUSTA Maintain BW Settings

RSCUSTA2 ODS Settings

RSCUSTV1 BW Customizing - View 1

RSCUSTV10 BW Customizing - View 10

RSCUSTV11 BW Customizing - View 11

RSCUSTV12 Microsoft Analysis Services

RSCUSTV13 RRI Settings for Web Reporting

RSCUSTV14 OLAP: Cache Parameters

RSCUSTV15 BW Customizing - View 11

RSCUSTV16 BW Reporting

RSCUSTV17 Settings: Currency Translation

RSCUSTV18 DB Connect Settings

RSCUSTV19 InfoSet Settings

RSCUSTV2 BW Customizing - View 2

RSCUSTV3 BW Customizing - View 3

RSCUSTV4 BW Customizing - View 4

RSCUSTV5 BW Customizing - View 5

RSCUSTV6 BW Customizing - View 6

RSCUSTV7 BW Customizing - View 7

RSCUSTV8 BW Customizing - View 8

RSCUSTV9 BW Customizing - View 9

RSD1 Characteristic maintenance

RSD2 Maintenance of key figures

RSD3 Maintenance of units

RSD4 Maintenance of time characteristics

RSD5 Internal: Maint. of Techn. Chars

RSDBC DB connect

RSDB_ADD_ID_2_CRM Create External ID for CRM-GP

RSDB_INIT Initial Download of D&B Data

RSDCUBE Start: InfoCube editing

RSDCUBED Start: InfoCube editing

RSDCUBEM Start: InfoCube editing

RSDDV Maintaining Aggregates

RSDIOBC Start: InfoObject catalog editing

RSDIOBCD Start: InfoObject catalog editing

RSDIOBCM Start: InfoObject catalog editing

RSDL DB Connect - Test Program

RSDMD Master Data Maintenance w.Prev. Sel.

RSDMD_TEST Master Data Test

RSDMPRO Initial Screen: MultiProvider Proc.

RSDMPROD Initial Screen: MultiProvider Proc.

RSDMPROM Initial Screen: MultiProvider Proc.

RSDMWB Data Mining Workbench

RSDODS Initial Screen: ODS Object Processng

RSDODSD Initial Screen: ODS Proces. (Deliv.)

RSDPMDDBSETUP Creates a MOLAP Database in MSAS

RSDPMOLAPDS MOLAP DataSource creation

RSDPRFCDSETUP Create MOLAP Rfc Tests

RSDSD DataSource Documentation

RSDU_SHOWTEMPINCTAB

RSDU_SHOWTEMPINCTABRSDV Validity Slice Maintenance

RSD_ACAT Maintain InfoObject catalog

RSEDIT Old editor

RSEIDOCM Variant for

RSEIDOCMRSENQ Display of Lock Log

RSEOUT00 Variant for

RSEOUT00RSFH Test Transaction Data Extractors

RSFLAT Flat MDXRSFREQUPL Frequent upload from source systems

RSGWLST Accessible Gateways

RSH1 Edit hierarchy initial screen

RSH3 Simulate hierarchies

RSHIER Hierarchy maintenance w/o AdmWB

RSHIERINT Hierarchy maintenance from AdmWB

RSHIERSIM Simulate hierarchies

RSICUBE Maintain/Change InfoCubes (Internal)

RSIMG BW IMGRSIMPCUR Load Exchange Rates from File

RSINPUT Manual Data Entry

RSIR_DELTATRACK KPro Delta Tracking

RSISET Maintain InfoSets

RSKC Maintaining the Permittd Extra Chars

RSLDAPSYNC_USER LDAP Synchronization of Users

RSLGMP Maintain

RSLOGSYSMAPRSMD Extractor Checker

RSMDCNVEXIT Conversn to Consistent Intern. Vals

RSMDEXITON Activate Conversion Routine

RSMO Data Load Monitor Start

RSMON BW Administrator Workbench

RSMONCOLOR Traffic light color in the Monitor

RSMONITOR_DB D&B Integration

RSMONMAIL Mail Addresses for Monitor Assistant

RSNPGTEST Test Network Plan Control

RSNPGTEST2 Test Network Plan Control

RSNSPACE BW Namespace Maintenance

RSO2 Oltp Metadata Repository

RSO3 Set Up Deltas for Master Data

RSOCONTENT Administration of a Content System

RSOCOPY Copy from TLOGO Objects

RSODADMIN Administration BW Document Managemt.

RSOR BW Metadata Repository

RSORBCT BI Business Content Transfer

RSORMDR BW Metadata Repository

RSPC Process Chain Maintenance

RSPC1 Process Chain Display

RSPCM Monitor daily process chains

RSPFPAR Display profile parameter

RSQ02 Maintain InfoSets

RSQ10 SAP Query: Role Administration

RSQ11 InfoSet Query: Web reporting

RSRAJ Starts a Reporting Agent Job

RSRAM Reporting Agent Monitor

RSRAPS Manages Page Store

RSRCACHE OLAP: Cache Monitor

RSRCATTTRACE Catt transaction for trace tool

RSREP BW Administrator Workbench

RSRFCCHK RFC destinations with logon data

RSRHIERARCHYVIRT Maintain Virtual Time Hierarchies

RSRQ Data Load Monitor for a Request

RSRR_WEB Report-Report Interface in Web

RSRT Start of the report monitor

RSRT1 Start of the Report Monitor

RSRT2 Start of the Report Monitor

RSRTRACE Set trace configuration

RSRTRACETEST Trace tool configuration

RSRV Analysis and Repair of BW Objects

RSRVALT Analysis of the BW objects

RSR_TRACE Trace Monitor

RSR_WEB_VARIABLES Variable Entry in Web

RSSCD100_PFCG Change Docs for Role Administration

RSSCD100_PFCG_USER for Role Assignment

RSSCM_APPL Application settings SCM4.0 and BW

RSSD Access for scheduler

RSSE Selection start InfoCube

RSSGPCLA Maintain program class

RSSG_BROWSER Simple Data Browser

RSSM Authorizations for Reporting

RSSMQ Start Query with User

RSSMTRACE Reporting Log Authorization

RSSTARTMON Starting the monitor in parall.proc.

RSSU53 Display authorization check BW

RST22 Old Short-Dump Overview

RSTB Choose Object Name

RSTBHIST Table history

RSTG_BUPA Target Group Sel. Business Partners

RSTG_CUST Target Group Selection Customers

RSTG_DB Target Group Selection D&B

RSTG_DB_WEB Target Group Selection D&B

RSTPRFC Create Destination for After-Import

RSU0 Update rules overview

RSU1 Create update rules

RSU1I Create update rules

RSU1O Create Update Rules

RSU2 Change update rules

RSU2I Change update rules

RSU2O Change Update Rules

RSU3 Display update rules

RSU3I Display update rules

RSU3O Display Update Rules

RSU6 Delete update rules

RSU6I Delete update rules

RSU6O Delete update rules

RSU7 Data Extraction: Maintain Parameters

RSUSR003 Check standard user passwords

RSUSR200 List of Users per Login Date

RSWELOGD Delete Event Trace

RSWEWWDHMSHOW Display Background Job SWWERRERSWEWWDHSHOW Display Work Item Deadline Monitorng

RSWWCLEAR Execute Work Item Clearing Work

RSWWCOND Execute Work Item Rule Monitoring

RSWWDHEX ExecuteWorkItemDeadlineMonitoring

RSWWERRE Start

RSWWERRERSZC Copying Queries between InfoCubes

RSZDELETE Deletion of query objects

RSZT Get Test Component

RSZTESTFB Shortcut Function Test Environment

RSZV Call up of view V_RSZGLOBV

RSZVERSION Set frontend version

RS_AWB_REMOTE Remote AWB Staging

RS_BCT_BWBEOTYP Maintain BW Backend Object Types

RS_DS_CHECK Check consistency request

RS_ISTD_REMOTE Maintain InfoSource

RS_LOGSYS_CHECK Source System ToolRS_PE

RS_ACTIVATE Activation of BEx Personalization

RS_PERS_BOD_ACTIVATE Activate BEx Open Pers.

RS_PERS_BOD_DEACTIVA Deactivate Pers. for BEx Open

RS_PERS_VAR_ACTIVATE Activate Variable Pers.

RS_PERS_VAR_DEACTIVA Deactivate Pers. for Variables

RS_PERS_WTE_ACTIVATE Activate Web Template Pers.

RS_PERS_WTE_DEACTIVA Deactivate Pers. for Web Template

SP01 Spool
 
Thanks,
Chindam Praveen Kumar,
Blue Marlin Systems,
www.bluemarlinsys.com/bi

Enhance the Standard LO(logistics) Extractor.

This article explains about Enhancing the standard LO Extractor. There may be client’s requirement to add some of the fields to the LO Extractor. This document is intend to explain the steps in R/3 and not in BI.


Let me explain this with a scenario. Customer has requested to add Field ZBIDAT to BI Cube ZSD_C01. This field needs to be extracted from R/3 table VBAK field ZDATE. This cube is loaded using the standard extractor 2lis_11_vascl, but this extractor does not have ZDATE field in it.

In R/3 this field ZDATE in table VBAK is populated while creating or changing the sales order using the Standard sales order user Exit. Being this is a custom Field in table VBAK it cannot be pulled into Standard extractor 2lis_11_vascl using LBWE.

We need to add this field to the extract structure and use the SAP extraction user exit to populate the values and then map this to the new field ZBIDAT in Cube ZSD_C01.

There are some Steps which need to be followed before making Enhancements to the standard LO extractors. Click HERE to check.

Goto RSA6 Navigate to extract structure 2LIS_11_VASCL. On Double click on this Extract Structure.


Now Double Click on ExtractStruct ‘MC11VA0SCL’ to append the new fields.


Below is the screen showing the Structure of Data source 2LIS_11_VASCL.


Now Hit on Append Structure and create a new append structure called ‘ZBIAPPEND’ (Any name) as shown in below screen.


Add/Create fields to the structure.


Save and Activate the append structure. Now again come back to RSA6 and now get into changed mode of the Data source. Here you will find the newly created field. Make sure to uncheck the ‘Hide Field’ and select ‘Field Only’ and generate the data source using the menu button Datasource  Genarate.


Now you need to write logic to populate this newly created field.
You do this in the SAP user Exit.
Go to Program ZXRSAU01 ( In function module EXIT_SAPLRSAP_002) write below logic to populate the values.


You can check the new field values in RSA3 t-code. Enter the data source name and hit on Execute.


Once the records are extracted you need to hit on Display List and then select any single packet to list the values. Below is the screen showing the values populated in ZDATE.


This is how we can add a custom field to the LO extraction.
 
Thanks,
Chindam Praveen Kumar,
Blue Marlin Systems,
www.bluemarlinsys.com/bi

Tuesday, August 17, 2010

Business Objects - Universe an overview

Business Objects Universe

A Business Objects Universe is the semantic layer that resides between an organization’s database and the end user but more importantly, it is a business representation of data warehouse or transactional database. It allows the user to interact with their data without having to know the complexities of the database or where the data is stored. Data manipulations on the universe will not affect the underlying database. The universe is created using familiar business terminology to describe the business environment and allows the user to retrieve exactly the data that interests them. Universes are made up of objects and classes that are mapped to the source data in the database and accessed through queries and reports. 


A universe contains

  • A connection parameter to a single data structure.
  • SQL structures called objects that map to actual SQL structures in the database. All objects are grouped into classes and subclasses.
  • A schema of the tables and joins from the database. The objects are built from the tables that are included in the schema.

Benefits of using Universe 

  • The Universe Designer application allows users to create universes using simple GUI.
  • Data security - data exposed by the universe can be limited to a specific group of users.
  • All data is secure. The data is read-only so there is no danger of the data being edited or changed by the end user. Changes made to universe data will not affect the original data.  
  • Maintenance of the universe is easy. 
  • End-users can use a simple interface to create reports and analysis and work with consistent business terminology.
 Where can we use the Universe


Best Practices in Building a Universe

  1. It is a good practice to build Universe piece-by-piece. 
  2. Avoid using automatic universe creation wizard. Universe created using wizard will be complex and difficult to understand.  
  3. Insert tables into universe one at a time.  
  4. Take each table, joins and cardinality one at a time. 
  5. Use short cut joins whenever possible to reduce no. of tables used in a Query. 
  6. Name the objects using common business terms as it would be easy for the end-user to understand. 
  7. Define measurable objects properly as not every number is a measure. 
  8. Maintain object formatting – format the object in the same way every time it is used. 
  9. Object formatting should be done at the Universe Level. 
  10. While using complex objects – build common calculations into universe where ever possible. 
  11. Never load user with complicated queries. 
  12. Lock the universe when editing to prevent other users from editing the same universe.

Posted by
Raghavendra Dutt B
Blue Marlin Systems Inc., 
www.bluemarlinsys.com/bi

Wednesday, August 11, 2010

Xcelsius Best Practices : Tips & Tricks

  1. Preparation, Processing, Validation and Structuring of data plays a central role in dashboard best practices.

  2. It's always a good start to have a rough design of the visualization on paper before starting up with the dashboard.
  3. Use step by step process to design the visualization. For example add data to the visualization once the basic design and layout is finalized.

  4. Make sure that the Excel spreadsheet should use only those Excel functions that are supported by Xcelsius else the visualization may not show expected results. The list of functions can be found in the Xcelsius Help or the MS Excel Help.
  5. Add dynamic visibility to the visualization, so that hiding and showing components can be done based on availability of data. For example if there is no data then the component can be in hidden mode.

  6. If there are large sets of data then they can be placed into multiple worksheets for easy lookup and reference.

  7. Identify the right components to be used for the available data to make the dashboard more effective and interactive.

  8. Test the visualization with some test data before using the actual ones. This helps us to test the outputs in terms of visibility and interactivity.

  9. It's always better to test the visualization i.e. the SWF file in different environments before it is actually deployed on the actual server due to Flash Player Security issues and runtime Errors.

  10. It is recommended to use Colors, Labels, Borders, Comments and Legends to identify the Inputs, Outputs and Xcelsius processing logic within the Excel spreadsheet.

  11. It should be ensured that the Excel Spreadsheet is not linked to other spreadsheets, does not contain Macros or contain third party plug-ins, otherwise the visualization may not give the expected results.

  12. The most commonly used data sets and processing logic should be placed at the top left corner of the Excel spreadsheet to avoid searching.

  13. Minimize the number of calculations and logic as it increases the processing time and consumes more time to display the visualization. Moreover hard code the data values as much as possible and remove unused data from time to time.

  14. While executing the SWF file from the desktop, it should be made trusted using the Global settings manager or using a Flash Player Trust configuration file.

  15. To embed the visualization onto a Web page the option 'Export to HTML' can be used to generate the HTML for the Web page. Alternatively Flash Variables or JavaScript can also be used.

  16. The MS Excel functions should be carefully selected to optimal performance of the resultant Dashboard. For example avoid using the MS Excel functions like SUMIF, COUNTIF, HLOOKUP & VLOOKUP on large sets of data to enhance performance.

  17. Try to research on the features available in the latest versions of Xcelsius that might fit to the data requirements.

  18. The data should be placed in an organized and logical manner in the Excel spreadsheet. For example, sufficient space should be available to the right and bottom of the data sets to so that incoming data in future can be accommodated.

  19. For dynamic dashboards use features for remote Data connectivity like XML Maps and Web Services.

  20. With the Latest release of Xcelsius 2008, it is possible to design custom components that can meet the visualization requirements as expected.

  21. Last but not the least to remember is…. "A Good Dashboard can improve the company's performance whereas a wrong design will have the reverse effect!"

Uday Kumar P,
Blue Marlin Systems Inc.,
uday_p@bmsmail.com

Logistics Extraction Cockpit

LO extraction refers to the process of extracting logistics data.Depending on the application area,it extracts the transaction data. For example, if you chose extract Sales order information, it picsk all the sales order data from the R/3 system.LO Extractors contains datasources and extraction logic criteria which is specific to logistics data.

  1. Positioning of Cockpit extraction
  2. Overview data flow
  3. Update Methods
Positioning of Cockpit extraction


Overview data flow


Transaction postings lead to:
  1. Records in transaction tables
  2. For an initial load a setup needs to be executed which reads the transaction data and stores the data in a setup table.
  3. These setup tables are read during an initial or full load.
  4. Further transactions are posted into the transaction tables and also caught into Update tables / Extraction Queue.
  5. A periodically scheduled job transfers these postings into the BW delta queue
  6. This BW Delta queue is read when a delta load is executed.
Update methods In Logistics Extraction:


  1. Direct Delta
  2. Queued Delta 
  3. Unserialized v3 update
 Direct Delta:
  1. Each document posting is directly transferred into the BW delta queue
  2. Each document posting with delta extraction leads to exactly one LUW in the respective BW delta queues 

Transaction postings lead to:
  1. Records in transaction tables and in update tables
  2. A periodically scheduled job transfers these postings into the BW delta queue
  3. This BW Delta queue is read when a delta load is executed


  1. Not suitable for environments with high number of document changes
  2. Setup and delta initialization have to be executed successfully before document postings are resumed
  3. V1 is more heavily burdened
  4. Extraction is independent of V2 update
  5. Less monitoring overhead of update data or extraction queue
Queued Delta :-

In this Extraction data is collected for the affected application in an extraction queue the collective run as    usual for transferring data into the BW delta queue.


  1. Records in transaction tables and in extraction queue
  2. A periodically scheduled job transfers these postings into the BW delta queue
  3. This BW Delta queue is read when a delta load is executed.
  4. V1 is more heavily burdened compared to V3
  5. Administrative overhead of extraction queue
  6. Extraction is independent of V2 update
  7. Suitable for environments with high number of document changes
  8. Downtime is reduced to running the setup
  9. Up to 10000 delta extractions of documents for an LUW are compressed for each DataSource into the BW delta queue, depending on the application.
Un Serialized v3 update:
  1.  Extraction data for written as before into the update tables with a V3 update module
  2.  V3 collective run transfers the data to BW Delta queue
  3. Records in transaction tables and in update tables
  4. A periodically scheduled job transfers these postings into the BW delta queue
  5. This BW Delta queue is read when a delta load is executed
  6. Only suitable for data target design for which correct sequence of changes is not important e.g. Material Movements.
  7. V2 update has to be successful
Preferred update method:

Queued delta: Up to 10000 delta extractions of documents for an LUW are compressed for each  DataSource into the BW delta queue.
Direct delta for small volumes and sufficient downtime possible.

By,
Praveen Yagnamurthy,
SAP BI Consultant,
Blue Marlin Systems-INDIA.
http://bluemarlinsys.com/bi .


How to use Start Routine in SAP BI Transformation

Many times we required to change the data while loading it to the data target and sometimes need to validate the data and then update them into the target. For this SAP has provided different options in Transformation.

1. Start routine.
2. Field Routine.
3. End Routine.

The idea of writing the routine depends on the requirement. For e.g. if you want to delete records based on some condition then this requirement can be handled at all the places but due to performance reasons it is always better to handle it in the Start routine.

Let me explain how to use Start routine with Scenario

The requirement is to load sales order for only those customers where Industry sector is ‘AFS’ using data source 2LIS_11_VAITM. The industry sector information is not available from data source 2LIS_11_VAITM (Data source to load sales order item data). But, we need to read this information from customer master data as Industry sector is one of the attribute of 0customer.


First create the transformation and hit on Start Routine to open the source code.


Identify the field required from the attribute tab of the info-object (in our case it is 0industry of 0customer)


Different tables of master data info objects are displayed in Master data/Text tab of 0customer info object. We can use /BI0/PCUSTOMER to fetch the industry information out of 0customer info object. Double click on this table will open the table definition in next Screen.


Now identify the field required. Here in our case it is INDUSTRY.


Now we have all the information required to write a start routine. Below is the screen shot showing the routine.


You can fill the monitor entries in case of any errors to trace and fix them.

By

Chindam Praveen Kumar.
Blue Marlin systems.
www.bluemarlinsys.com/bi

Friday, August 6, 2010

TECHNIQUES FOR BUILDING EFFECTIVE PERFORMANCE DASHBOARDS

Techniques for Effective Dashboards

This document presents 10 key techniques for building effective dashboards. It is based on industry research as well as experiences with customers who have avoided impromptu methods and taken the time to develop and deploy their dashboards in a structured manner.
  1. Choose the right type of dashboard 
  2. Dashboard content: Use best practices but don’t forget your own experts
  3. The goal is Actionable Business Intelligence
  4. Position dashboards into an integrated reporting framework
  5. Consistent screen visualization eases user navigation
  6. Provide smart drilldowns of data
  7. Data sourcing done right: Don’t forget the plumbing
  8. Provide simulations for decision support
  9. Allow users to document data anomalies
  10. User Feedback
Please follow below link to know more details:

Top 10 Techniques For Building Effective Performance Dashboards

Raghavendra Dutt B
Blue Marlin Systems Inc.,
www.bluemarlinsys.com/bi

Wednesday, August 4, 2010

How to create a WEBI Report on top of SAPBI Query

Data Flow During Different Update Mode in LO Cockpit
The objective of this Article is to explain step by step process of creating a WEBI report on top of SAP BI query.
 Data Flow :-


  1.  Create a Bex Query on top of SAP BI.
  2. When you are creating a query allow the external access to that particular( "Allow External Access to this Query"  ). Only then your query will be accessible in universe.
  3. Open universe designer  Click on New .Give the technical name for universe
  4. Give the connection name choose SAP Client 
  5. Choose connection pool mode
  6. Export the Universe 
  7. Log on INFO VIEW(We can see all Exported universes in INFOVIEW)
  8. Open webi through infoview 
  9. Drag and drop your Key figs and characteristics in webi work area 
  10. Run the query.
  11. You can play around with the webi report as per your requirement  
By,
Praveen Yagnamurthy,
SAP BI Consultant,
Blue Marlin Systems-INDIA.